| Topic: |
Testing and comparing lenses,
a 'how to'
guide
|
|
Author/Copyright:
|
John Jovic
|
In the simplest and most practical terms
testing a lens allows you to find or define a lenses qualities. Testing and
understanding a lenses qualities or performance
allows you to know once and for all what that particular lenses effect will have
on your photography.
It's a good idea to test any lens that you use regularly to find it's
limitations. Often the reasons for inferior performance (usually
sharpness) are blamed on the lens but might in fact be due to another
factor, camera shake, flimsy tripods, poor focusing or other poor
photographic techniques.
There are many different reasons to test lenses as lenses have many
traits or characteristics which differentiate them. The two images below are
just one example of a very simple test allowing the Bokeh to be evaluated. Not all lenses will behave the same way
as the example below and some may
have the opposite behaviour. Knowing your lenses, through testing, helps you to
get the best from them.
 |
|
 |
| These
two images where shot with the same lens and at the same aperture
(F2.8), but with the lens focused at different points, creating a
completely different Bokeh. In this case the lens was focused behind
the subject, creating a soft foreground Bokeh. |
|
In this case
the lens was focused in front of the subject, creating a harsh
background Bokeh. It shows how the same lens behaves quite differently
depending on where it has been focused.
|
Another form of testing a lens
is to compare it directly with very similar lenses from another maker.
Comparing lenses can tell you a lot about the lenses in question. The
minor differences that might otherwise go unnoticed can be made quite
obvious when comparing otherwise identical images. A crucial element in
comparing lenses is to ensure that the images are taken in identical
circumstances so that any differences can be correctly attributed to the
lens itself rather than due to changes in the test conditions.
Although most modern
lenses perform quite well, careful testing can reveal differences in
performance which may in fact be significant in certain circumstances.
Some lenses are sharper wide open than others or might have greater
resistance to flare. Certain lenses have very harsh or very smooth
Bokeh so can be used in different ways to exploit these traits.
However, there are certain steps which must be followed to ensure test
results that are meaningful and these will be discussed below in some
detail.
What do you want to know about your lens?
Lenses are complex devices and their performance can be measured in
many ways. A 50mm lens could be as simple as a 3 or 4 element lens or as complex
as a Zoom with 23 elements (such as a Canon 70-200 f/2.8L IS II USM). Each lens will have it's own traits, quirks or qualities
but one lens won't necessarily be 'better' than the other in every
possible way. When testing your lens(es) the first consideration that
must be made is to decide which quality will actually be tested. There
is no single test which will tell you everything you need to know about
a lens but there are several relatively simple ways to test various
qualities, some of which are listed below.
| Lens Test (Trait or Quality) |
Description |
| Sharpness, centre |
Most lenses perform well in the centre
however lenses generally get sharper as they are stopped down, up to a
point, but then become less sharp as you keep stopping them down to
their smallest aperture (largest F stop). |
| Sharpness, edge or corner |
Some lenses are simply not sharp at the
edges or corners of the frame, even when stopped down. Other lenses
have to be stopped down to a particular aperture range to achieve a
satisfactory level of sharpness. Lenses can also have alignment faults
or issues where the left and right edges are of unequal sharpness. |
| Sharpness at minimum focusing distance
(MFD) |
Some lenses are sharper at close range
than they are at infinity. One can assume that a Macro lens is designed
for close range performance however it might still be extremely sharp
at infinity and therefore a useful general purpose lens. |
| Sharpness at Infinity |
Some lenses are sharper at infinity than
they are at close range. |
| Focus Shift |
The exact point of focus can actually
change when you stop a lens down. This can have major implications and
should be known for any fast lens. This is NOT to be confused with
"front/back focusing" issues which occur with Auto Focus cameras which
can some times focus in front of or behind the subject. |
| Vignetting |
The evenness of illumination across the
frame varies with aperture and focus point. Vignetting is worst when a lens is
focused at infinity so this is how vignetting should be tested. |
| Bokeh |
The 'Out of Focus' (OOF) areas in front
of and behind the subject can look quite different depending on many
factors. |
| Flare |
Lenses are coated to reduce flare but
some coatings are better than others. Flare can be a major factor in
lens performance in situations such as night photography where there
may be light sources in the image. |
| Chromatic Aberrations |
The most common forms of CA
are Longitudinal CA and Purple Fringing and both of these can be tested
quite easily. |
| Field Curvature |
The focus plane (the plane where the lens
is actually focused) might not be a straight line parallel to the sensor/film
plane. It might be a curve which changes depending on the distance that
the lens is focused. |
| Physical faults, dust, lens damage,
scratches, fungus |
Lenses can be damaged in many ways, such
as scratches, chips or cracks, lens separation, internal dust or fungus
but the fault may not even have an effect on the image quality, or
possibly only a negligible one(s). Testing is the only way to know for
sure. |
| Distortion |
A lens can change or distort the shape of
the subject being photographed. |
Basic lens testing
methodology
Regardless of the specific test being performed it is very important
that all external factors that can affect the results are eliminated.
Often the differences in results are difficult to see or discern so it
is important to ensure that only the effect of the lens is seen and not
those caused by careless testing.
An example of poor technique could be in the choice of subject matter
such as tress or plants which sway in the wind. No two images will be
exactly the same so it can be very difficult to see minor difference if
they exist.
Another example of poor technique may be the choice of lighting or
weather conditions. If you where to test out doors on a cloudy or
overcast day then the likelihood of the light being the same for an
extended period is low. The different lighting in test images would
potentially outweigh or hide many minor differences in performance.
Consistency in lighting is often very important.
Some general points that apply to most tests are detailed below. These
are the most basic steps that should be adhered to so as to minimise
external influences on the test results.
| |
Record everything, write everything down
so that your tests make sense later. It helps to know what you've done
if things don't quite work out the way you expected, or, if comparing lenses so
that the exact same steps can be performed repeatedly. |
| |
Ensure consistent lighting. If shooting
outdoors then don't shoot on cloudy days when the lighting is
constantly changing. |
| |
Ensure consistent colour temperature. |
| |
Use a solid tripod and do not move the
camera or framing during testing. Slight differences in framing can
make it very difficult to compare images later (especially if comparing
several lenses). Is your floor solid? Will walking/moving around on
your wood floors during a 1/2 second exposure cause your camera/tripod
to move? |
| |
Minimise camera vibration. Use mirror
lockup or any feature which allows you to fire the shutter without
touching the camera. Certain cameras have several Mirror lockup options
so ensure you are using the option with the least vibration. For
example, the Canon 5D2 has significantly less vibration in either Live
View Silent Mode (there are 2) compared to images shot in Live View
without Silent Mode activated. |
| |
Focus very carefully and absolutely
consistently. Focusing in a slightly different place, possibly only a
millimetre apart, can cause a significant difference in the test
result. |
| |
A lenses performance will typically vary with
distance so test at various distances or at the distance most
relevant to the way that you use it. It's no use testing a lens at
1m if you intend using it for landscape or pictorial photography at
much greater focusing distances. |
| |
Some lenses are affected by focus shift
which means that they will change focus as the aperture is changed on
the lens. If a lens is known to suffer from focus shift then it must be
refocused (stopped down) at each aperture being tested. This can be
very difficult to do once a lens is stopped down significantly however
it can significantly affect the results. It can also be a good idea to
shoot multiple exposures where the lens has been refocused each time, in case
of any focusing errors. In general, the first test that should be
performed with any fast lens such as a 50mm F1.4 (or similar) is a test
for focus shift. If the lens is found to be affected then further
testing will need to take this into account. |
| |
Use Live View to focus manually if you
have that option. Zoom in the maximum amount to focus. Avoid using AF
or a viewfinder as inaccuracy is likely. It can even be a good idea to
shoot several frames having refocused each time, and then choose the
sharpest frame. |
| |
Filters can influence the performance of
a lens so remove any filters. |
| |
Choose your test subject carefully. Don't
shoot trees, branches or plants which might sway in the wind and move
during an exposure. Shoot a subject which will be rock solid. You might
think that your exposures are short enough to record a sharp image, and
they might be, but the difference between subsequent images will make
it harder to see minor differences. |
| |
Consider centre and edge/corner sharpness
as separate tests. If you are testing centre sharpness then focus in
the centre. If you are testing edge/corner sharpness than focus on a
subject at the edge or corner of the frame. Some lenses suffer field
curvature so the plane of focus may be curved and therefore at
different distances from the camera. |
| |
Shoot RAW and at the cameras optimum ISO.
This ensures optimum image quality and also allows colour temp can be
altered if needed. When viewing an image it is best to convert the RAW
file into a TIFF which is an uncompressed and lossless format. If you
shoot in camera Jpegs then the cameras Jpeg compression algorithms may alter the
fine details of an image, ie at pixel level. If you have to shoot jpegs
then use the finest/highest quality standard the camera offers. |
| |
When converting RAW files check the RAW converters
settings to ensure that you know what you are seeing in your test
images. Some converters will automatically fix various aberrations
such as vignetting, distortion or CA so make sure these are enabled
or disabled as required, but don't ignore them. |
| |
View test images at 100% and do not
sharpen except to overcome any effects from a cameras Anti Aliasing (AA) filters.
Excessive sharpening will adversely affect your findings. |
| |
If testing a zoom lens then treat it like
it is several prime lenses and test each focal length individually. A
zoom will potentially perform differently at different points in it's
zoom range, or focal length. |
Processing your
RAW test images
If you have shot the image in RAW format then you will most likely be
converting the images to TIFFs or Jpegs and then potentially taking
100% crops from those images using an application such as Photoshop.
The RAW files may need minor adjustments to colour balance and/or
levels depending on the nature of the tests. The advantage of shooting
in RAW format is that any changes during the RAW conversion process
will have minimal effect on the image.
In some cases you will need to adjust each RAW image individually so
that the images have the same colour balance or exposure, whilst in
other tests it may be important to ensure that all the test images have
the same processing settings, such as colour balance and levels. For
example, minor differences in exposure can affect the apparent
sharpness or definition in an image so it can be a benefit to adjust
the levels between subsequent frames when testing sharpness. On the
other hand, if you are testing the colour handling qualities of a lens
then it may be better to apply the same adjustments to all files so
that any visible differences are due to the lens itself rather than any post
processing.
If comparing several lenses you may have to decide if all the lenses
will receive the same processing or if each lens will have it's own
treatment, again, depending on the nature of the tests.
Sharpening
Sharpening any image will alter the information in the image so
sharpening, and it's degree, needs to be carefully considered.
 |
|
 |
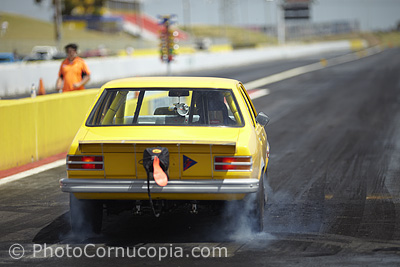
| This
image appears 'acceptably' sharp because it has been downsized and
sharpened. The rear of the car is in fact completely out of focus
and this image would be unacceptable at higher resolutions which
would clearly show the lack of sharpness, but here it 'looks' sharp. |
|
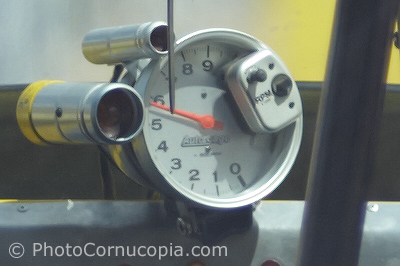
The image to the left
was in fact focused incorrectly and inside the car instead of on the
rear of the car. This 100% unsharpened crop is a good example of a
very high level of resolution where even the individual graduations
on the Tachometer, ie the 9 steps in between the printed numbers, can be
seen clearly. However, it may not appear particularly 'sharp'.
|
Although it's common to sharpen images, especially after resizing,
sharpening any 100% crops may alter the actual information from the lens to a
point where it may affect your conclusions. 100% crops are typically used to
show what is happening at the pixel level and to reveal the resolution
and performance of the lens. Resolution should not be confused with
sharpness as you can always increase the apparent 'sharpness' of an
image but you can't put more information or detail into the image, which
comes from the resolution of the lens. The 100% crops in the
various examples in this article have NOT been sharpened. Excessive
sharpening will potentially give you a sharper image but will it tell
you what you wanted to know about your lens?
Most digital cameras have Anti Aliasing (AA) filters on their sensors
which have the effect of softening an image if viewed at 100%. It is
reasonable to sharpen an image a very small amount, enough to
counteract the effect of the AA filter, but no more. Many RAW
converters allow you to set a default level of sharpening which
essentially counteracts the AA filter. If you are already using a RAW
converter with a default sharpening level then consider if this is
appropriate and set as necessary.
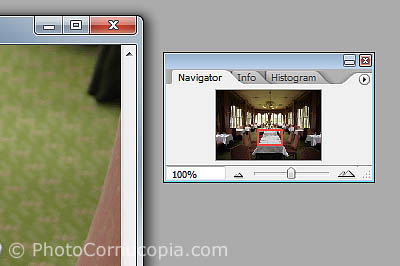
Viewing your test results
If you've shot your test images in Jpeg format then you will need to
view them so that you can see what is happening at the pixel level, or
'pixel peep'. Many programs can be used to do this but the most common
one is probably Photoshop or possibly even Windows Paint.
Most lens tests are efforts to show minor differences in performance
which can be difficult to distinguish. In general, such as when testing
sharpness, a test image will need to be viewed at 100% magnification in
an application such as Photoshop. Viewing at 100% simply means that one
pixel in the image will be displayed as one pixel on your display. This
allows you to see the greatest possible detail in an image however it
can also be useful to view an image at even greater magnification such
as 200% or greater which simply magnifies the information further. Of
course you could argue that you would never view an image this way in
the real world, and that may be the reason so many people are happy to
use inferior lenses, however, such 'pixel peeping' may be required to
see what's really happening.
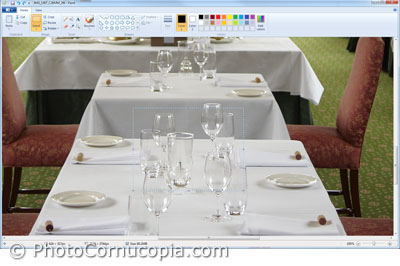
All lenses, even
those with a wide depth of field, will only ever be sharpest at one
point which is where the lens has actually been focused. In the above
example, which was shot at F2.8 with a wide angle lens, the point of
sharpest focus is actually quite narrow. Glasses which are a few feet
closer, visible in the foreground in the 100% centre crop, are already
quite a bit softer than the glasses which are actually in focus. Some
people would assume that a wide angle lens would have much greater
depth of field but this simply isn't always the case and careful
focusing and analysis of the files is always required.
|